
Last modified 4/19/2011.
This document refers to versions of CourseForum and ProjectForum starting with version 7. For older versions, see the older themes HOWTO.
This document describes how you can create new themes, augmenting those already bundled with CourseForum and ProjectForum.
For examples of different themes, you can have a look at our theme exchange.
Both CourseForum and ProjectForum (full versions only) offer a choice of themes, allowing administrators to radically change the appearance of the entire site or an individual forum. Both products ship with several themes already installed, and themes can be selected via the site or forum administration interfaces.
Besides the themes shipped with the products, new themes can be added to the available choices. Themes can be created so that CourseForum or ProjectForum sites are branded to match other web sites or institutional materials. Themes can be created also simply to match personal preferences.
Creating and modifying themes is done by the site administrator, entirely via the web-based administration interface, in the "Custom Themes" section (below). You can create a new theme (starting with an existing theme), or modify any of the theme components (changing styles, adding or deleting images, etc.).
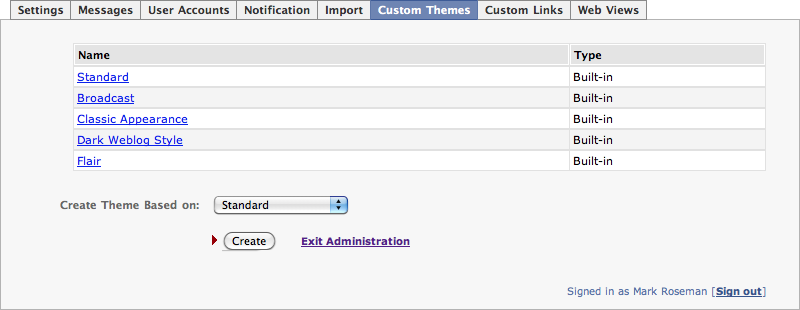
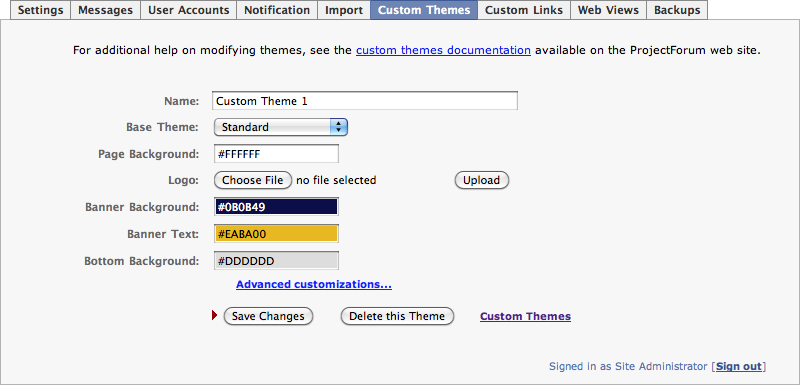
When you create a new theme, you'll be presented with the theme editor (below). Each of the different built-in themes has several different parts that can be easily modified. The include things like colors used in different parts of the pages and logos.
If you know a little bit about standard web development and Cascading Style Sheets (CSS) in particular, you can do a lot more.
Clicking on the "Advanced customizations..." link will allow you to make more changes to the theme. In particular, it allows you to add new CSS stylesheets to the theme.

Typically, if you are making some changes you're going to just want to add a new "extra.css" stylesheet, by choosing it from the popup menu and pressing the "Add" button.
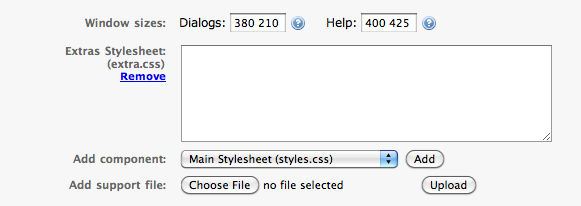
We'll get into what you might want to put into extra.css in a moment. You'll also note that you can upload new support files, typically images, that are referenced from your stylesheets or elsewhere.
Themes can contain a number of different types of components: CSS style sheets, images, and HTML includes, which can all be modified via the web-based theme editor.
Note that a theme does not have to define every one of these components. If the theme component is not part of the theme, CourseForum and ProjectForum will look in the theme that the custom theme was derived from. If the component is also not there, it will look in the "default" theme.
Main CSS style sheet [styles.css]. Style sheets allow you to change the fonts, colors, and positioning of elements on the page. All pages automatically load in a main stylesheet. Simple changes can involve setting colors, fonts, adding images, etc. More complex changes can radically adjust the appearance of the site, whether different components are displayed, where they are located, etc.
If your custom theme will be fairly close to the base theme that you derived it from, you probably don't want to include a styles.css, but just let your theme automatically pick up the one from the built-in theme. This is particularly helpful because it means that any changes made to the built-in themes in later software versions will automatically be picked up by your custom theme. Instead, make your changes in extra.css.
Extra CSS style sheet [extra.css]. This stylesheet is loaded immediately after styles.css. None of the built-in themes use extra.css, it is solely for use in custom themes. As explained above, making your customizations here rather than in styles.css means that your custom theme will pick up future modifications of the base theme.
Print CSS style sheet [print.css]. A second stylesheet can also be provided, which will be loaded on the 'Print' pages after the main stylesheet. This can be used to adjust the appearance of the print pages slightly; see the 'Broadcast' theme for an example.
Base CSS style sheet [base.css]. There is actually one more stylesheet you should know about. The base stylesheet isn't actually part of any individual theme. There is a single base stylesheet that all themes rely on; this is loaded before the theme-specific stylesheets.
Images [home.gif, help.gif, edit.gif, post.gif, ...]. You can replace the various GIF images that are used throughout the software with your own images. You can also add your own images (e.g. a corporate logo), which would need to be referenced from the main stylesheet.
HTML includes [pagetop, pagebottom, contentend, headtags]. You can insert arbitrary new HTML code into pages by including any of these three HTML includes in your theme. You can use these for example to add header and footer areas to all pages. The HTML is inserted immediately after the initial <body> tag (pagetop), immediately before the closing </body> tag (pagebottom), right after the main content of the page (contentend), or in the <head> area of the page (headtags) respectively.
As with most web development, you can get pretty far by using the "Inspect Element" command available in most modern browsers, which lets you select an element on the page, and find information about the various CSS styles that are contributing to its appearance onscreen.
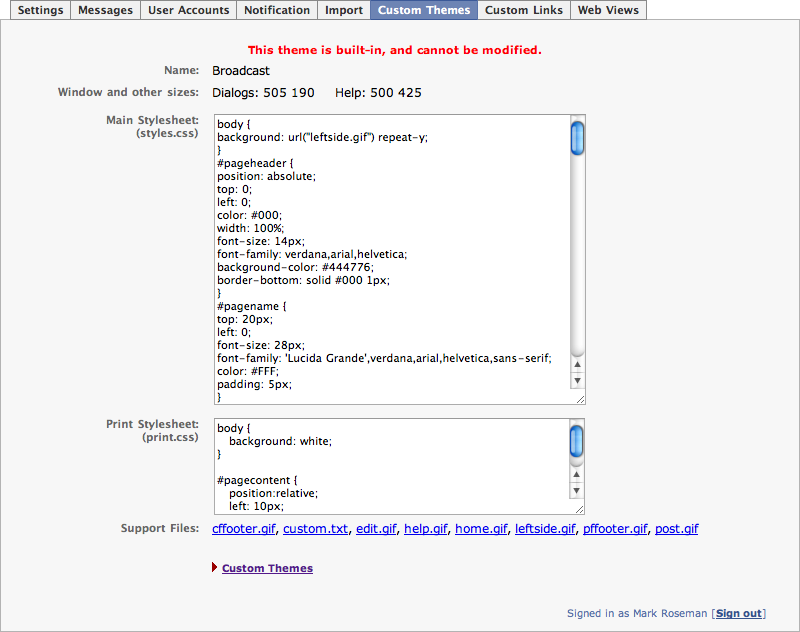
However, it also pays to look at the stylesheets for the built-in themes, as well as the base stylesheet. While you cannot modify them directly, you can certainly copy, paste and modify liberally in custom themes. Below is an example of the built-in Broadcast theme.
And as a starting point, here are some of the common styles that are used.
body, div, p, etc. These basic styles (at the top of most stylesheets) affect overall appearance; change background color and overall fonts here. #pageheader Used by many themes to provider a header bar at the top, containing page name, etc. Modify this to change its size, color, add a background image (e.g. corporate logo) and more. #pagename Adjust where and how the name of the current page is shown. #forumname Adjust where and how the name of the current forum is shown. #pagecontent Div for main body area of page; useful for adjusting margins, etc. Not used on content pages. #bodycontent: Div for main body area of page; used on content pages. #pagefooter Div containing the footer area; not used on content pages. #smallfooter Div containing the footer area; used on content pages. #bottomcontrols Div containing the comment area, other command links, last modified, etc. #viewbox Div containing the four buttons, search form, key pages, recent changes etc. for content pages. #commandbuttons Div containing the post, edit, home, help buttons. Useful to reposition, hide, etc. #keypages Div containing the key pages. #searchform Div containing the search form. #recentchanges Longer (multi-line) display of recent changes. Usually either display this or the next, not both. #shortrecentchanges Short display of recent changes. .heading Formatting for headings. .form* Styles used primarily in forms (e.g. admin pages). #adminpage* Styles used on administration pages.
Themes are created and modified using the web-based theme editor, so there is little reason to be concerned about how they are stored on disk. However, if you want to share your theme with someone else, or you are using a version of CourseForum or ProjectForum prior to version 4.3, this may be useful.
Themes are stored in the "themes" directory within the "Group Data" or "Course Data" directory. Each theme gets its own directory within that, and that directory will contain the theme files (styles.css, etc.). If the theme does not provide a particular file, the file from the default theme will be used in its place.
To make it easier to share themes, all the components of a theme can also be packaged into a single ".zip" file (created using zip, winzip, or other utilities). The ".zip" file can then be placed directly into the "themes" directory.
Several such files are available for download on our theme exchange. It contains images and downloads of several different themes, for inspiration or to try. If you've created an interesting looking theme and want to share it with others, please let us know.
There were a number of significant changes made to themes in version 7. Most importantly, this was the version that 'extra.css' was introduced; prior to that themes would typically make their changes in the 'styles.css'. Because of that, the custom theme wouldn't automatically pick up the newer theme changes in version 7.
Here are a few things that we've found helpful when upgrading pre-version 7 custom themes.
Base Theme Problem Solution All Background of bottom commands (new page, edit, ...) not blending in #bottomcommands {background-color:#eee;border-bottom-width:0px;}
.imgCmdLabel {background-color:#eee;}All Bottom commands a bit low and to the right #bottomcommands {left:0px;top:0px;} All 'Post your comments' text area too large #commentstext {width:300px;height:45px;} All Don't show icons for 'new page, 'edit', etc. .cmlink img {display:none;}
.cmlink {margin-left:10px;padding-top:5px;}
.cmimglink img {display:none;}
#bottomcommands a.cmimglink div.imgcmdplacer {position:static;}
.cmimglink div.imgCmdLabel {position:static;display:block;border:none;width:auto;background-color:#eee;}Dark weblog Administration pages washed out .formlabel,.formtextlabel,.formentrylabel {color: #ccc;}
.formtable,.formadmintable {background-color: #666;}
.toggle_tabs li {background: #666;}
.toggle_tabs li a {color: #ccc;}
.formadminfooter {color: #ccc;}
#adminpageexit a {color: #3ff;}Dark weblog 'Post your comments' label too dark, offset #postmsgs {top:30px;color:white;} Dark weblog 'Last modified...' too low, too dark #modified {top:-25px;color:white;} Flair 'Page last modified' should be on left edge of page, not right #modified {right:auto;}